Abstract
-
Chart patterns are an important technical analysis tool used to identify shifts in market supply and demand, trend continuation, and potential trend reversals.
-
Pattern analysis is not about mechanically memorizing chart formations; it requires a comprehensive assessment of trends, trading volume, support and resistance levels, time duration, and the validity of breakouts.
-
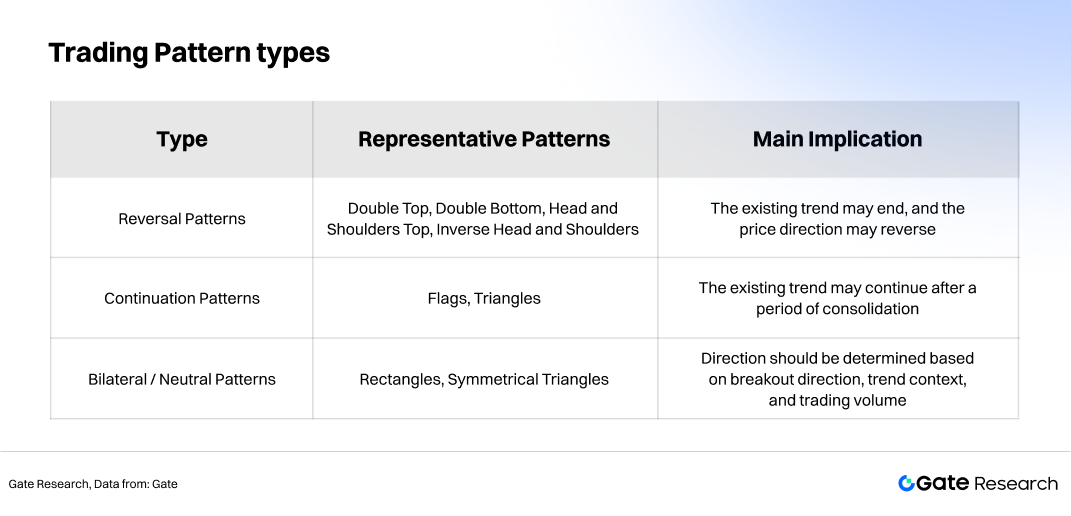
Chart patterns can generally be divided into two categories: reversal patterns, such as Double Tops, Double Bottoms, Head and Shoulders Tops, and Inverse Head and Shoulders; and continuation patterns, such as Flags, Triangles, and Rectangles.
-
A valid breakout is typically supported by clearly defined support or resistance levels, an extended consolidation period, the prevailing market trend, and confirmation from trading volume.
-
A breakout does not guarantee a sustained move. False breakouts occur frequently in real-world trading, making risk management essential. Traders should control risk through position sizing, stop-loss orders, retest confirmation, and scaling out of positions to lock in profits.
1. Introduction
Chart patterns are an important tool in technical analysis for identifying changes in market supply and demand, trend continuation, and potential trend reversals. The core principle is that price action reflects the balance of buying and selling pressure among market participants, while chart patterns condense this interaction into observable visual structures. Pattern analysis is not about mechanically memorizing shapes; rather, it involves a comprehensive evaluation of trends, trading volume, support and resistance levels, time duration, and the validity of breakouts.
Breakout trading is one of the most direct applications of chart pattern analysis. A valid breakout is typically built upon clearly defined support or resistance levels, an extended period of consolidation, the broader trend context, and confirmation from trading volume. However, a breakout does not guarantee a sustained move. False breakouts occur frequently in live markets, making risk management essential. Traders should manage risk through position sizing, stop-loss orders, retest confirmation, and scaling out of positions to secure profits.
2. Theoretical Framework of Chart Pattern Analysis
2.1 Two Fundamental Assumptions
Technical analysis is generally built on two fundamental assumptions:
In an uptrend, buyers generally dominate the market, while in a downtrend, sellers tend to have the upper hand. However, no trend lasts forever. When buying and selling forces approach equilibrium, prices typically enter a consolidation phase, during which chart patterns begin to form. Once consolidation ends, the market may either continue in the direction of the existing trend or undergo a trend reversal.
2.2 Classification of Chart Patterns
Common chart patterns can generally be divided into several categories. It is important to note that chart pattern classification is not absolute. The same pattern may carry different implications depending on its location within the trend, the timeframe being analyzed, and the accompanying volume structure.
3. Major Chart Pattern Types
3.1 Rectangle Pattern
A Rectangle pattern forms when price oscillates between two parallel support and resistance levels, indicating market indecision. Rectangles are generally considered continuation patterns, but they can also evolve into reversal patterns depending on the breakout direction and volume confirmation. Typical characteristics include:
-
Price repeatedly tests the upper and lower boundaries.
-
Support and resistance levels are clearly defined.
-
Buying and selling forces remain relatively balanced during the consolidation period.
-
A valid breakout or breakdown should be accompanied by a noticeable increase in trading volume.
Rectangle patterns are commonly classified into Bullish Rectangles and Bearish Rectangles. Whether the breakout occurs to the upside or downside, the subsequent price move is often approximately equal to the height of the rectangle.
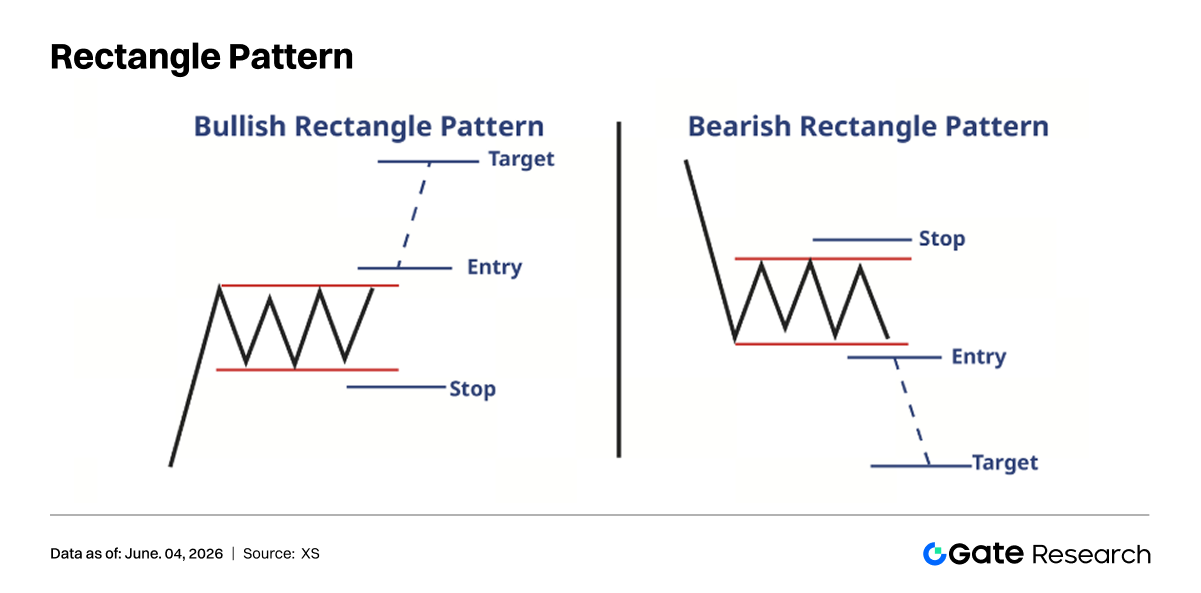
Bullish Rectangle: A bullish rectangle forms during an uptrend when price pauses its advance and consolidates between two horizontal price levels. This pattern suggests a temporary consolidation before the uptrend resumes. A breakout above resistance, accompanied by increased volume, confirms trend continuation. Traders may initiate long positions after the breakout and project a target equal to the rectangle's height above the resistance line.
Bearish Rectangle: A bearish rectangle forms when price consolidates within a horizontal range during a downtrend. This pattern represents a temporary pause before the downtrend resumes. A breakdown below support confirms continuation of the bearish trend. Traders may enter short positions after the breakdown and project a downside target equal to the height of the rectangle.
3.2 Flag Pattern and Pennant Pattern
Both Flags and Pennants are short-term continuation patterns that typically appear after a sharp upward or downward price movement.
A Flag consists of a strong directional move (the flagpole) followed by a rectangular or parallelogram-shaped consolidation phase (the flag), which usually slopes against the prevailing trend.
A Pennant also begins with a sharp price movement (the flagpole), but is followed by a small symmetrical triangle formed by converging trendlines.
Typical characteristics include:
-
A strong rally or decline should precede the pattern.
-
Trading volume is usually high during the flagpole phase.
-
Volume often declines during consolidation.
-
Volume should expand again when the breakout occurs.
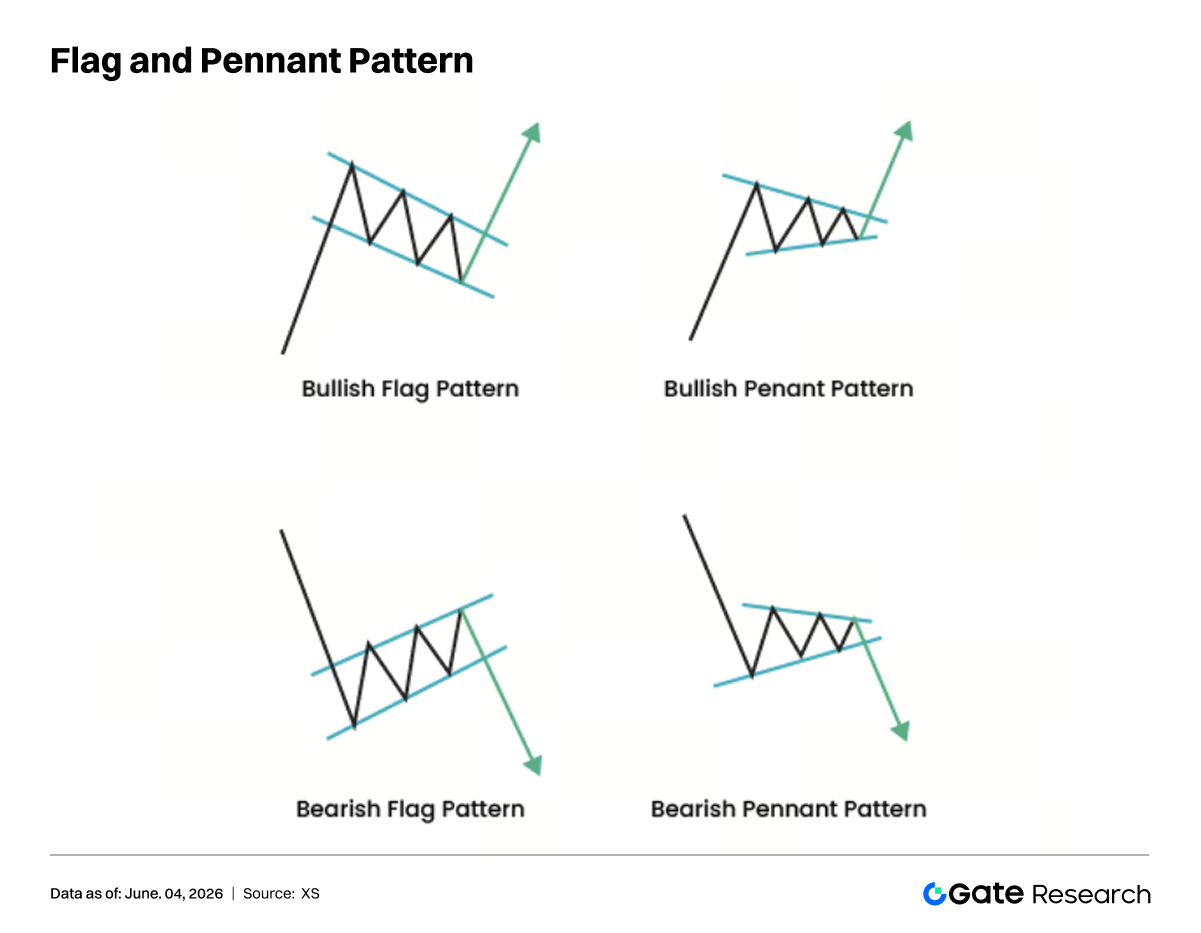
Flag and pennant patterns generally signal that the prevailing trend is likely to continue. Breakouts typically occur in the direction of the original flagpole. After the breakout, traders often use the length of the flagpole to estimate the price target.
Traders may enter positions when the breakout occurs. For a bullish flag, traders look for a breakout above the upper trendline. For a bearish flag, they look for a breakdown below the lower trendline. Profit targets are typically based on the flagpole height, while stop-loss orders are used to manage risk and protect against false breakouts.
It is worth noting that rectangle patterns often take around three months to develop, whereas flag patterns generally form within approximately three weeks.
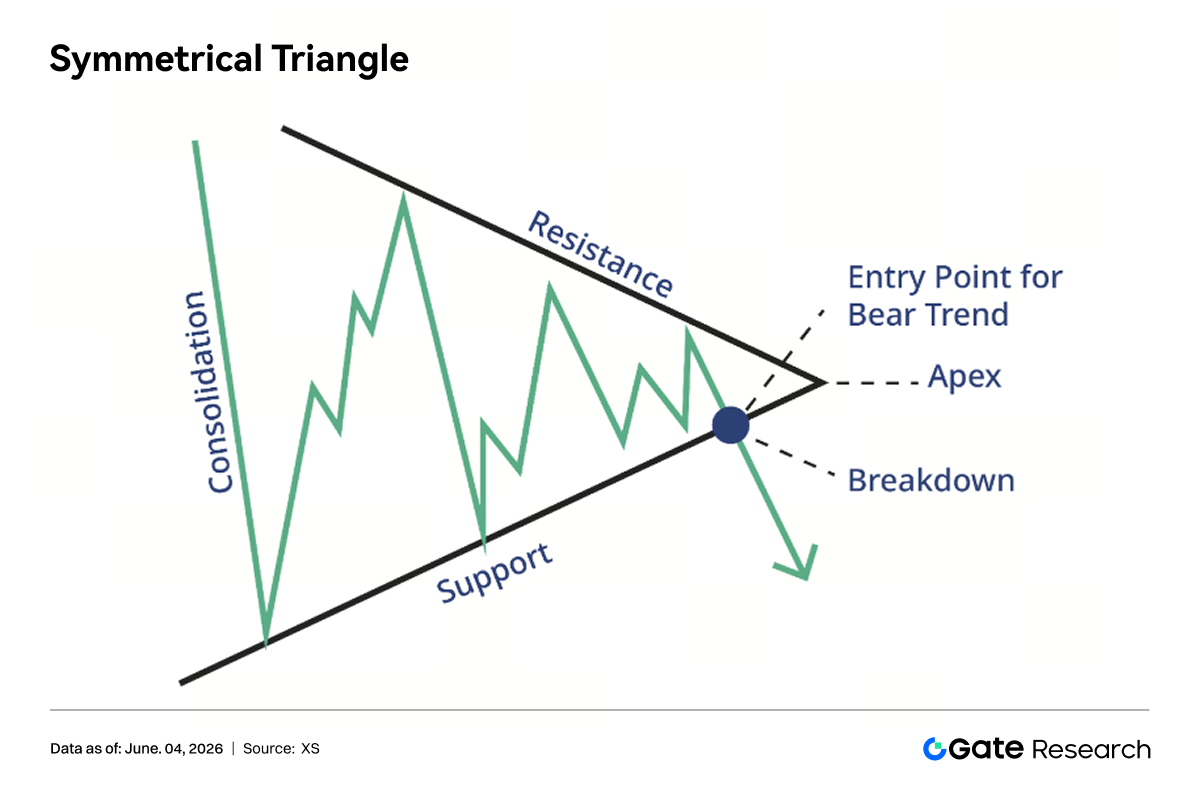
3.3 Symmetrical Triangle
A Symmetrical Triangle is generally considered slightly bullish but can break out in either direction. It is characterized by progressively lower highs and progressively higher lows, causing the trading range to narrow over time. Unlike pennants, symmetrical triangles typically persist for more than three weeks.
This pattern reflects a period of market indecision in which buying and selling forces temporarily approach equilibrium. While symmetrical triangles frequently act as continuation patterns, they can also become reversal patterns. Rather than predicting the breakout direction in advance, traders should wait for a confirmed breakout or breakdown.
Typical characteristics include:
-
At least two progressively lower highs.
-
At least two progressively higher lows.
-
Volume generally declines as the pattern contracts.
-
The ideal breakout point often occurs between one-half and three-quarters of the pattern's duration.
-
Breakouts should be confirmed by volume expansion and accelerating price movement.
Price targets can be estimated using two common methods:
The essence of a symmetrical triangle is not determining which side has already won, but recognizing the gradual contraction of market volatility. Lower highs indicate that sellers are becoming active earlier during each rally, while higher lows suggest that buyers are stepping in earlier during each pullback. As pressure builds from both sides, the market eventually resolves through either a breakout or a breakdown.
3.4 Ascending Triangle
An Ascending Triangle is generally regarded as a bullish pattern. Its upper boundary is relatively horizontal, representing resistance, while the lower boundary rises progressively, indicating that buyers are willing to enter the market at increasingly higher prices.
The core message of this pattern is that sellers repeatedly defend the same resistance level, but buying pressure gradually strengthens and may eventually force a breakout.
Typical characteristics include:
-
A relatively flat resistance level at the top.
-
Progressively higher lows at the bottom.
-
A significant increase in volume during the upside breakout.
-
Former resistance often becomes support after the breakout.
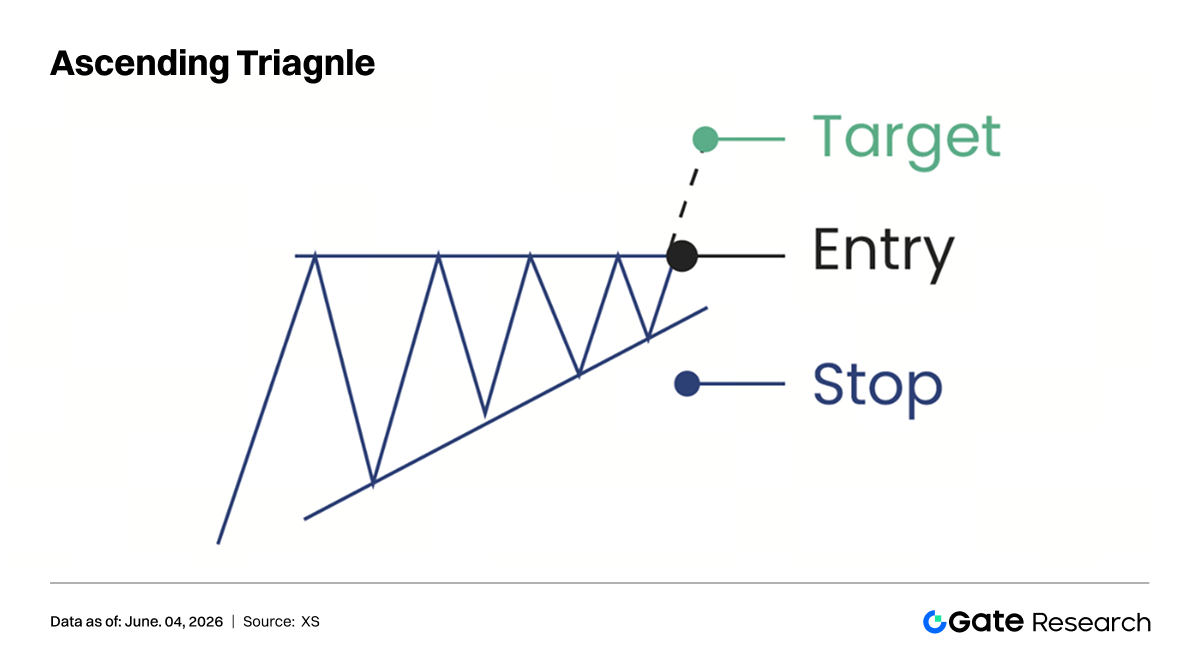
A common target calculation method is to measure the widest height of the triangle and add that distance above the breakout point.
The key feature of an ascending triangle is the combination of fixed resistance and rising support. Multiple tests of resistance indicate persistent selling pressure, while increasingly higher lows suggest that buyers are willing to accumulate shares at higher prices. As the trading range narrows, selling supply is gradually absorbed. If price eventually breaks above resistance on strong volume, substantial upside potential may emerge.
3.5 Descending Triangle
A Descending Triangle is the inverse of an ascending triangle and is generally considered a bearish pattern. Its lower boundary remains relatively horizontal, representing support, while the upper boundary slopes downward, indicating that sellers are becoming increasingly aggressive at lower price levels.
Typical characteristics include:
-
A relatively flat support level at the bottom.
-
Progressively lower highs at the top.
-
Former support may become resistance after a breakdown.
-
Price targets are commonly projected downward using the height of the pattern.
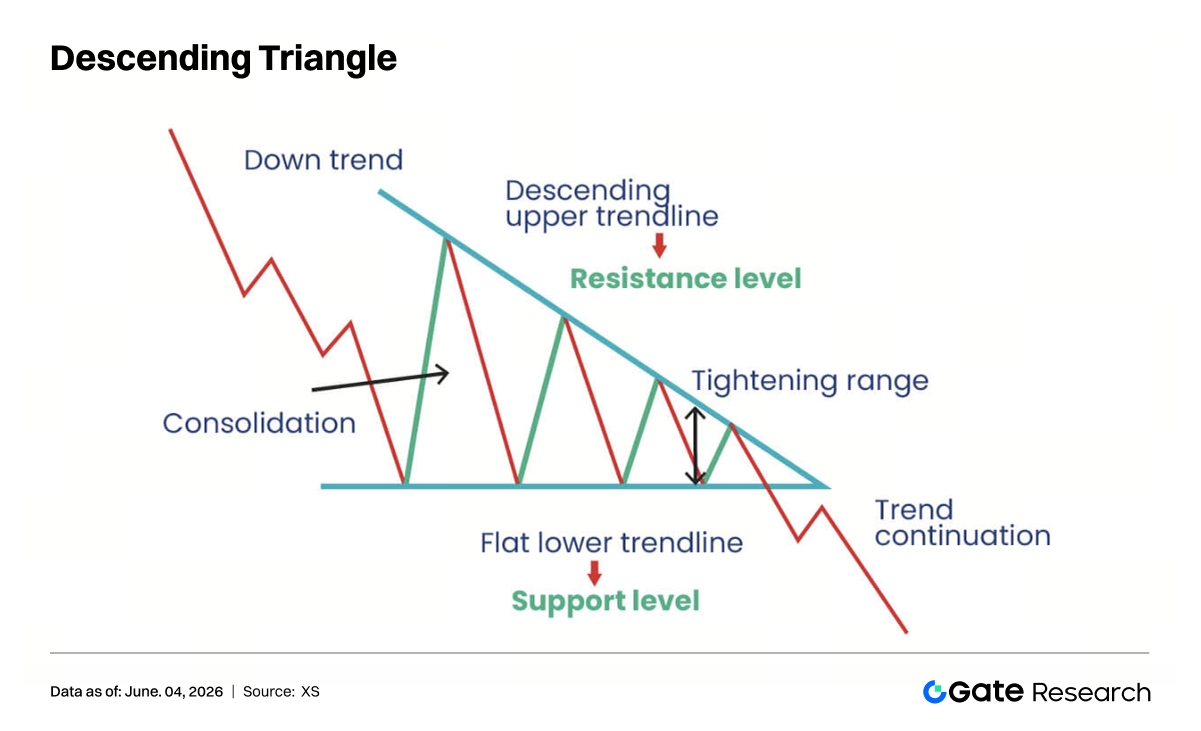
The core characteristic of a descending triangle is repeated testing of support while rally highs continue to decline. Multiple touches of support indicate that buyers are still defending the area, but each rebound becomes weaker, suggesting that sellers are willing to sell at progressively lower prices. As bullish momentum fades, a breakdown below support may trigger stop-loss orders and additional selling pressure, accelerating the decline.
3.6 Head and Shoulders & Inverse Head and Shoulders
The Head and Shoulders Top is one of the most important bearish reversal patterns and typically appears near the end of an uptrend.
The pattern consists of a left shoulder, head, right shoulder, and a neckline. The neckline is formed by connecting the lows on either side of the head and extending the line to the right. The head stands higher than both shoulders, while the two shoulders are generally of similar height.
The formation process is typically as follows:
-
During an uptrend, price reaches a new high and forms the left shoulder.
-
Price then rallies to a higher high, forming the head, often with weaker volume.
-
A third rally fails to exceed the head's high, forming the right shoulder.
-
The pattern is completed when price breaks below the neckline, confirming a trend reversal.
Volume behavior is an important confirmation signal. The left shoulder is often accompanied by strong volume, volume declines during the formation of the head, and volume weakens further during the right shoulder rally. A surge in volume on the neckline breakdown increases the reliability of the reversal signal.
The price target is typically calculated by measuring the vertical distance from the head to the neckline and projecting that distance downward from the breakdown point. After the neckline is broken, the former support level often turns into resistance.
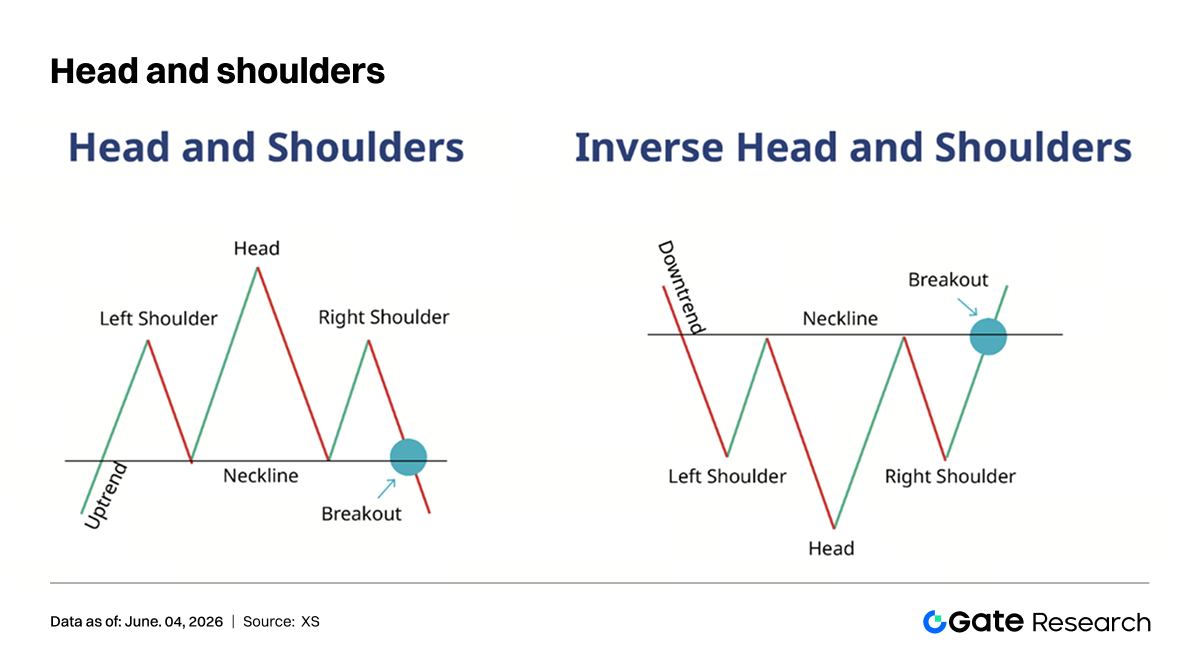
The Inverse Head and Shoulders is the bullish counterpart of the Head and Shoulders Top and usually appears near the end of a downtrend. Its structure consists of a left shoulder, head, right shoulder, and neckline, with the head positioned below the two shoulders. The logic, interpretation, and target calculation methods are essentially the reverse of those used for the standard Head and Shoulders pattern.
4. Breakout and Breakdown Trading Strategies
4.1 Definition of Breakout Trading
A breakout occurs when price moves above a clearly defined resistance level and continues higher. A breakdown occurs when price falls below a clearly defined support level and continues lower. Collectively, both are often referred to as breakouts.
The primary focus of breakout traders is not the price fluctuations within a trading range, but rather the trend expansion that occurs after price escapes the existing range. The underlying logic of breakout trading is that once a prolonged consolidation period or a well-defined chart pattern has formed, a valid breakout may trigger a significant directional move.
Breakout trading is effective because it reflects market psychology and herd behavior. Many traders place buy orders above resistance levels and sell orders below support levels. When price breaches these levels, a large number of pending orders may be triggered simultaneously, causing rapid price movement. Fear of Missing Out (FOMO) can further amplify the momentum.
4.2 The Relationship Between Range Trading and Breakout Trading
Range traders typically buy near support and sell near resistance, profiting from repeated price fluctuations within a defined channel. Breakout traders, on the other hand, wait for price to escape the range before entering in the direction of the move. The two approaches are not contradictory; rather, they correspond to different phases of market behavior.
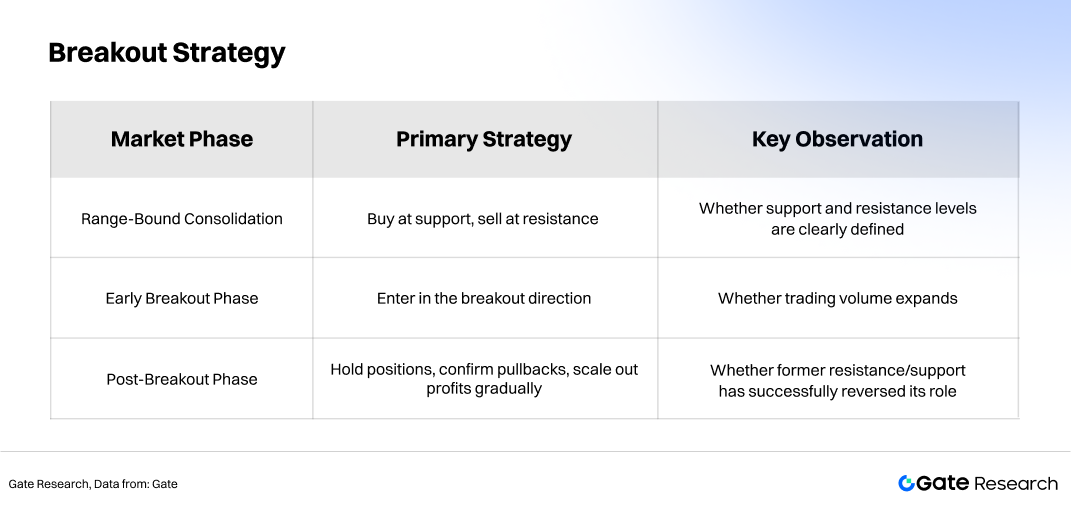
4.3 Conditions for a Valid Breakout
A valid breakout typically exhibits the following characteristics:
-
Price breaks above a clearly defined resistance level or below a clearly defined support level.
-
A recognizable consolidation range or chart pattern exists before the breakout.
-
Trading volume expands during the breakout.
-
Price does not quickly return to the previous trading range.
-
If a retest occurs, former resistance should become support, and former support should become resistance.
In practice, breakout validity should not be judged solely by intraday price movements. Greater emphasis should be placed on the closing price. If price temporarily breaks above resistance during the trading session but closes back below it, this suggests that selling pressure remains strong. Conversely, if price closes firmly above resistance while volume expands, the breakout signal is generally more reliable.
For daily-chart traders, daily closing confirmation is often more meaningful than intraday price action. Short-term traders should likewise rely on the closing prices of their respective trading timeframes to avoid being misled by temporary volatility.
The quality of the consolidation preceding the breakout is equally important. High-quality breakout setups generally possess three characteristics:
-
Clearly defined boundaries, allowing market participants to identify similar support and resistance levels.
-
Sufficient consolidation duration, indicating substantial exchange of positions among participants.
-
Gradually contracting volatility, suggesting that a directional move is approaching.
If price suddenly surges without prior consolidation or a meaningful resistance level, the move is more likely to represent short-term speculation rather than a structural breakout.
Breakout signals can be classified into three categories:
Strong Breakouts
-
Large bullish or bearish candles accompanied by high volume.
-
Closing prices significantly beyond the breakout level.
-
Price remains outside the original range afterward.
Moderate Breakouts
Weak Breakouts
Different breakout strengths should correspond to different position sizes rather than being traded with a uniform risk allocation.
4.4 Entry and Stop-Loss Management
Basic trading guidelines include:
-
Enter long positions above the high of the first breakout candle during an upside breakout.
-
Enter short positions below the low of the first breakdown candle during a downside breakout.
-
In range trading, buy near support and sell near resistance.
-
For breakout trades, stop-loss orders can be placed approximately 1%–2% beyond the breakout level or beyond key support and resistance levels within the chart pattern.
Entry strategies can be further divided into three categories:
Immediate Breakout Entry
Traders enter as soon as the breakout occurs. This approach is suitable when volume expands significantly, the closing price is strong, and the broader market trend is favorable. The advantage is participation in the strongest moves; the disadvantage is greater exposure to false breakouts.
Retest Confirmation Entry
Traders wait for price to pull back and test the former resistance or support level after the breakout. This method often provides a clearer risk-reward ratio but may miss strong trends that never retest.
Scaling Into Positions
A partial position is initiated at the breakout, with additional exposure added after successful retest confirmation. This approach balances participation and risk control.
Stop-loss placement should follow the principle that the trade should be exited when the pattern is invalidated.
-
For rectangle breakouts, the pattern weakens if price returns to the range and repeatedly fails to regain the breakout direction.
-
For triangle breakouts, a return inside the triangle often invalidates the signal.
-
For head-and-shoulders patterns, a move back across the neckline after a confirmed breakout or breakdown requires reassessment of the reversal signal.
Stop-loss levels should not be mechanically fixed at a single percentage. Instead, they should account for volatility, volume, liquidity, timeframe, and position size.
Position sizing may also be adjusted according to signal quality. Strong breakouts can justify larger allocations, moderate breakouts may warrant exploratory positions, and weak breakouts should generally be avoided until confirmation occurs.
If multiple timeframes align in the same direction—for example, an uptrend on the weekly chart, a rectangle breakout on the daily chart, and simultaneous volume expansion—position sizing may be more aggressive. Conversely, if a short-term breakout occurs near a major long-term resistance level, position size should be reduced or profit targets tightened.
4.5 Profit-Taking and Position Management
In trading, entering a position is often relatively easy; exiting and managing positions requires far greater discipline.
The essence of profitable breakout trading is allowing valid trends to develop fully while limiting losses from false breakouts. Common position management techniques include:
-
Selling part of the position after the first profit target is reached.
-
Retaining the remaining position to follow the trend.
-
Using trailing stops to protect unrealized gains.
-
Reducing exposure or exiting if price quickly returns to the original trading range.
Profit-taking methods can generally be categorized into three approaches:
Target-Based Exits
These are appropriate when chart patterns provide clear projection measurements, such as rectangles, triangles, and head-and-shoulders formations.
Structural Exits
These occur when price reaches previous highs, previous lows, long-term moving averages, or significant high-volume trading zones.
Trend-Following Exits
These are suitable for strong post-breakout trends and may utilize moving averages, trendlines, prior swing lows, or volatility-based stops as exit criteria.
Two of the most common performance drains in breakout trading are taking profits too early and cutting losses too late.
If profits are taken immediately after a breakout, traders may miss the primary trend expansion phase. Conversely, failing to exit after a failed breakout can allow a single loss to erase multiple smaller gains. Once a breakout trade develops a reasonable unrealized gain, stop-loss orders can be moved toward breakeven. After the first target is reached, part of the position can be realized, while the remaining position is managed according to predefined trend-following rules.
5. Types of Breakouts and Their Trading Implications
Price movements following a breakout can generally be classified into three categories: valid breakouts, pullback breakouts, and false breakouts.
5.1 Valid Breakouts
The breakouts discussed above are all examples of valid breakouts. Price rises rapidly and rarely looks back. There may be a brief pullback lasting a few candlesticks, but in most cases, price continues moving in the breakout direction until the trend eventually ends. This type of opportunity is the ideal scenario for trend traders, although it does not occur frequently.
Typical characteristics of a valid breakout include:
-
A strong breakout candlestick body;
-
A closing price outside the breakout zone;
-
Trading volume significantly above the average volume during the consolidation period;
-
Limited pullback following the breakout.
If price continues moving in the breakout direction for several consecutive candlesticks after the breakout, it suggests that market consensus has formed. In such cases, traders may adopt a trend-following approach rather than exiting prematurely at a small profit target.
5.2 Pullback Breakouts
A pullback breakout occurs when price first breaks above resistance, then retraces to test the original breakout area, confirms it as support, and subsequently resumes moving higher. Many traders prefer to wait for pullback confirmation before entering in order to reduce the risk of false breakouts. The risk is that not all breakouts provide a pullback opportunity. Traders who wait too long may miss a strong and rapid price advance.
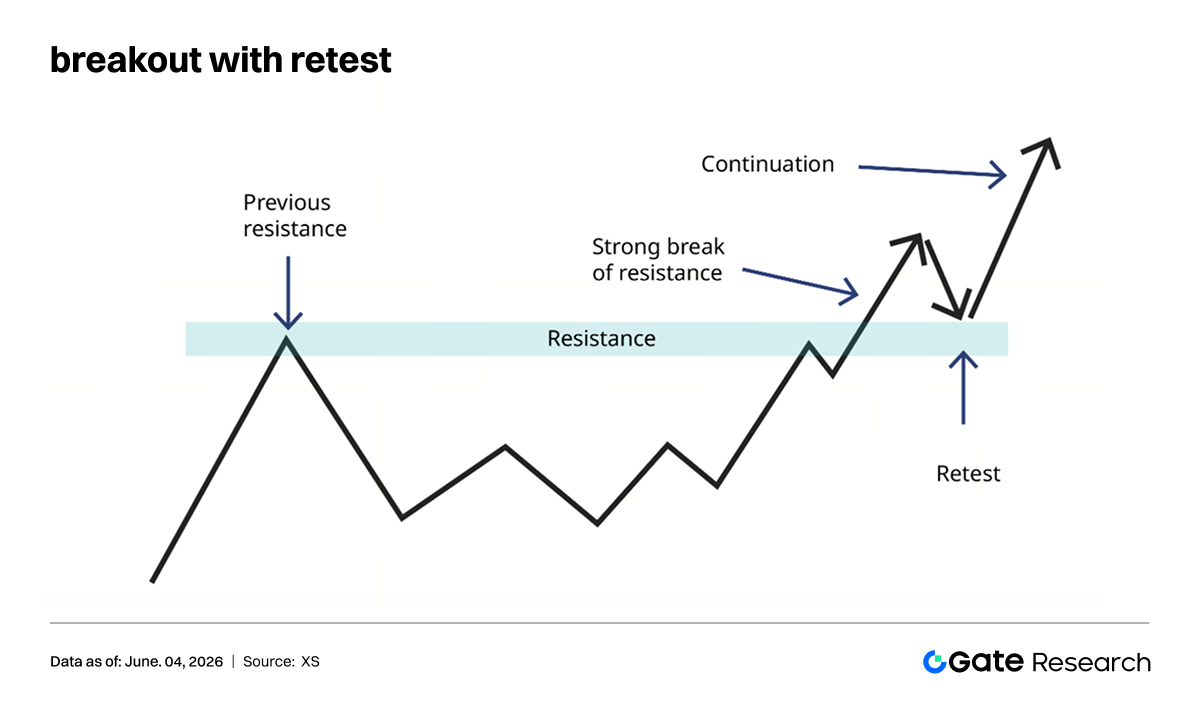
The key to a pullback breakout is whether the pullback is “orderly.” A healthy pullback is typically characterized by declining volume during the retracement, followed by renewed volume expansion as the trend resumes. If volume increases during the pullback, and price falls back below the breakout level and remains within the original trading range, the breakout may have failed.
For downside breakouts, traders should similarly observe whether the rebound is rejected near the former support zone, which may have become resistance. Pullback entries are generally suitable for traders with lower risk tolerance. Their advantages include closer stop-loss placement and a more favorable risk-reward ratio. The disadvantage is that strong trends may not provide a pullback opportunity. Therefore, in strong trending markets, traders may consider entering with a partial position at the breakout and adding to the position after pullback confirmation.
5.3 False Breakouts
A false breakout occurs when price briefly breaks above resistance or below support but quickly reverses back into the original trading range, and may even move in the opposite direction. False breakouts occur relatively frequently and are a major source of psychological stress and trading losses. The key to dealing with false breakouts is not attempting to avoid them completely, but rather acknowledging their existence in advance and limiting losses through stop-loss orders and position management.
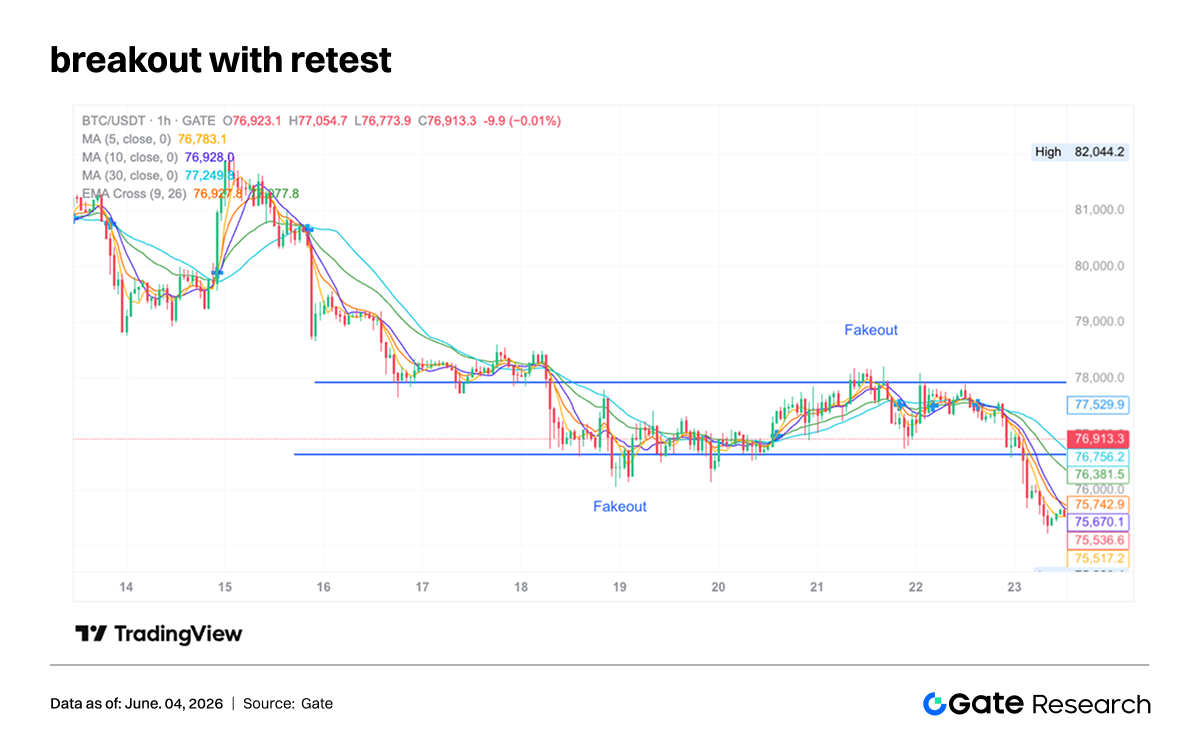
False breakouts commonly occur in three situations:
-
The overall market lacks a clear trend, and breakouts near range boundaries are primarily driven by short-term speculative activity.
-
Trading volume does not increase significantly during the breakout, indicating insufficient participation from new capital.
-
The breakout encounters higher-timeframe resistance or support, causing the lower-timeframe signal to be overwhelmed by the larger market structure.
Three signs may help identify a false breakout:
-
Price fails to close consistently outside the key breakout level.
-
Trading volume contracts rapidly after the breakout.
-
Price quickly reverses below the low of the breakout candle or above the high of the breakdown candle.
To manage false breakout risk, traders may reduce position size on the initial breakout, require closing-price confirmation, or wait for a pullback confirmation before increasing exposure.
6. Breakout Confirmation Indicators
6.1 Volume
Trading volume is one of the most important indicators for validating chart pattern breakouts. Volume typically declines during the consolidation phase and should expand noticeably during the breakout phase.
This is particularly important for upside breakouts and inverse head-and-shoulders neckline breakouts. Without volume confirmation, the reliability of the breakout decreases.
6.2 Support and Resistance Reversal
The conversion of support into resistance and resistance into support is a fundamental concept in breakout trading.
After price breaks above resistance, the former resistance level often becomes new support. After price breaks below support, the former support level often becomes new resistance.
Whether a pullback or rebound successfully respects these converted levels is one of the key factors in confirming breakout validity.
6.3 Momentum Indicators
The following momentum indicators can also be used to validate breakout trades:
-
Average True Range (ATR): A volatility indicator. Rising ATR values reflect increasing market activity, which may contribute to price breaking through established levels.
-
Moving Averages (MA): Indicators used to identify the prevailing market trend. Breaks above or below major moving averages can confirm that the trend has changed.
-
Bollinger Bands: A volatility indicator. When volatility declines, the Bollinger Bands contract, a condition known as a “squeeze.” Price often breaks out of its range shortly after a squeeze occurs.
-
Relative Strength Index (RSI): Helps traders identify overbought and oversold market conditions before or after significant price movements.
7. Conclusion
Chart patterns and breakout trading provide a structured framework for market analysis, but their effectiveness comes from the interaction of multiple factors rather than from any single pattern alone. Trend context, volume confirmation, support and resistance reversals, pattern duration, and risk management collectively determine the quality of a trading signal.
For institutional and professional traders, chart pattern analysis is often most effective as one component of a broader trading system rather than as a standalone decision-making tool.
A more robust approach is to use chart patterns to build a watchlist, use breakout confirmation to trigger trading plans, manage risk through position sizing and stop-loss orders, and manage trend profits through partial profit-taking and trailing stops.
Reference:
Gate Research is a comprehensive blockchain and cryptocurrency research platform that provides deep content for readers, including technical analysis, market insights, industry research, trend forecasting, and macroeconomic policy analysis.
Disclaimer
Investing in cryptocurrency markets involves high risk. Users are advised to conduct their own research and fully understand the nature of the assets and products before making any investment decisions. Gate is not responsible for any losses or damages arising from such decisions.